👋 Hey! It is Karin here.
Welcome to my ✨ newsletter ✨. This is the place where I tackle topics around product, business, personal finance and spirituality. Subscribe today to get each and every issue.
I think of prototypes as the simplest (non-functional) form an idea can take. I use them to validate an assumption around the solution that is the core of a future business.
(For more around prototypes check my previous post.)
In this article, I will answer the main question I get from my clients:
Let's dive into it.
Next week, I am going to walk you through this with a real world example of one project of mine.
Requirement (pre-work): start with an insight
Your starting point should be an insight around a problem and solution for a specific target group. If you don’t have this, then go back to the drawing board and invest some time to establish a solid understanding of the problem and its potential solutions. Without this, the rest of the exercise is pointless. You must know who you are serving and what pain point you are addressing.
Bonus points if your solution is a pain-killer type of product. (I will write about this at some point)
Step 1: Make an Educated Guess
Now, make an educated guess about what the solution should be. Keep it concise and clear, like an old-school tweet (140 characters).
Use this structure:
“[Solution] helps [target audience] solve [problem] by [approach (how this is different)].”
Step 2: Identify Underlying Assumptions
Write down the underlying assumptions for this business idea to work. What would need to be true for this business to work?
Ask yourself three critical questions:
- Desirability: Why would the customer want this?
- Feasibility: What do we technically need to design or build for this to work?
- Viability: Who will pay for this?
If your creative juices aren’t flowing, flip the questions into their negative form:
- Why would the customer not want this?
- What technical challenges could prevent this from working?
- Why wouldn’t someone pay for this?
Write each assumption on a post-it so that you can work with them on the next step.
In my experience, the negative form leads to more drastic or skeptical thoughts, which is exactly what we need at this stage. You might want to invite someone else to brainstorm and generate more ideas while having more fun 😎.
Step 3: Identify Critical Assumptions
Prioritize your assumptions based on their criticality and the evidence you have to support them. You want to focus on the assumptions that are both critical to your idea's success and where you have the least evidence.
This diagrams illustrates:
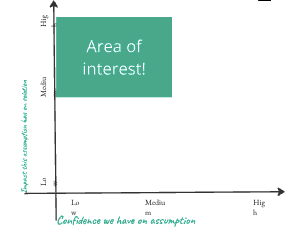
Out of the assumptions you place in the area of interest, pick one you like.
Step 4: Ideate the Smallest Possible Solution
This is the creative part. Consider the smallest possible solution that can test your critical assumption. Prototypes go from paper sketches, via landing pages, video demos, ad campaigns or running an event like a webinar. Be creative
Step 5: Define Your Success
Do not skip this step! Define what success looks like for this prototype. Is it people signing up for your email list? How many would you expect for a period of time? Are you after people actually buying your product? Or Signing up for a demo? Be clear about the KPI and the time range and budget. You need to have clarity around what to expect.
Step 6: Build the Prototype
Build the prototype using your tool of choice or a combination of tools. Whether it’s a simple wireframe, a clickable digital prototype, or a basic landing page, choose tools that you are comfortable with and that suit the nature of your prototype. For inspiration check my AllProtoTools site.
Step 7: Think of a Go-to-Market Strategy
Your prototype is ready, but how will you get it in front of your target audience? Plan a simple go-to-market strategy. Will you use social media ads, reach out to your network, or perhaps leverage a community or forum where your target audience hangs out?
Step 8: Launch and brace your self

By following these steps, you can create an effective prototype that helps you validate your assumptions with minimal resources. Remember, the goal of prototyping is to learn and iterate quickly. Keep things simple, stay focused on your critical assumptions, and don’t be afraid to pivot based on what you learn.
I hope this guide helps you in your prototyping journey. Feel free to share your experiences or reach out with any questions. Happy prototyping!
Finding this newsletter valuable? Share it with friends or subscribe.